Introduction: Traditional Bread Baking Italy
There is a quiet magic when a wood-fired oven gets going. First, the pop of the kindling. Then that low, steady hum as the flames settle against the brick. Inside, the bread remembers a rhythm older than any modern recipe book. This piece is for anyone who wants to understand that rhythm—whether you are a seasoned food enthusiast, a home baker looking to deepen your craft, or a traveler planning a trip to Italy. We will cover the history, technique, and practical steps behind this timeless craft. We are talking about the true soul of traditional bread baking in Italy, a practice that connects you to more than just a loaf of bread.
I spent way too long figuring this out the hard way. Here’s what I wish I’d known from the start.
At Baccole, we have spent years hosting guests in the heart of Tuscany, showing them that this process is less about rigid formulas and more about understanding a conversation between fire and flour. This article pulls from that lived experience—the feel of the dough in your hands, the heat of the oven on your face. Let’s start from the beginning.
Related: 10 Things to Know Before Your First Agriturismo Stay: Essential Agriturismo Travel Tips | Essential Italian Phrases for Booking and Arriving: Speak with Confidence | When to Visit Italy for the Best Agriturismo Experience

Why Wood-Fired Ovens Produce Superior Bread
The first thing you notice about bread from a wood-fired oven is the crust. It is not just browned. It is a deep, rich umber, often blistered in places, carrying the faint perfume of the wood itself. This is not an accident. The science behind it goes back as far as the Etruscan hearths that dotted this land centuries before Rome.
There are three main reasons why a wood-fired oven holds an edge over modern alternatives. First is heat transfer. Brick and stone hold and radiate heat evenly from every surface. Unlike a convection oven that blows hot air around, a wood-fired oven surrounds the bread with consistent, intense heat from the floor, the walls, and the arch. This creates a high, quick oven spring as the loaf instantly puffs up.
Second is steam. A wood-fired oven naturally retains moisture from the dough as it bakes. That initial burst of steam keeps the crust soft long enough for the bread to expand fully. Only after that initial surge does the intense dry heat harden the crust into a shattering, paper-thin shell. In a standard home oven, you have to cheat by adding water to a pan or using a special steam function.
Third is flavor. The wood—olive, oak, or beech—imparts a subtle smokiness that cannot be replicated. The long, slow build of heat from the fire also caramelizes the sugars in the dough more effectively, creating complex, nutty notes. This is why traditional bread baking in Italy has stubbornly clung to wood-fired methods. It is not just nostalgia. It is a deliberate choice for a better result.
For travelers or home bakers looking to replicate this, there are some excellent books on building your own wood-fired oven. They are not just a nice read—they are a blueprint for understanding the physics of this craft. Anyone serious about the practice might consider a guide on oven construction and techniques.
The Essential Ingredients for Authentic Italian Bread
Italy’s bread tradition is a story of simplicity. The typical loaf—often called “pane sciocco” in Tuscany, meaning “silly bread” because it contains no salt—relies on just a few ingredients. But those ingredients carry a lot of weight.
The flour is the foundation. While all-purpose flour works in a pinch, authentic Italian bread is made with “farina di grano duro” (durum wheat) or “farina di grano tenero” (soft wheat) with a high protein content. In Puglia, you’ll find the famous “rimacinata” durum flour, which gives bread a distinct yellow tint and a hearty chew. Travelers should look for “00” or “0” flours labeled “tipo” for bread making. You can find high-quality Italian flours at specialty markets, but for those serious about practice at home, sourcing a good Italian “tipo 0” or “tipo 1” flour online is the next best thing.
The starter, “lievito madre” or “pasta madre,” is the real heart of the operation. It is a stiff sourdough starter, less liquid than the typical San Francisco version, and it provides a subtle lactic tang. If you are taking a workshop, many hosts, including at Baccole, will provide you with a piece of their own mother starter—a living cultural treasure you can take home.
Water is non-negotiable. Soft, unchlorinated water is ideal. Hard water can inhibit fermentation. If you are baking in Italy, the tap water is generally fine as it is low in chlorine. Finally, salt—fine sea salt is the standard. The ratio is simple: for 500 grams of flour, you will use roughly 10 grams of salt and 350 to 400 grams of water. A digital scale is your most important tool. Do not rely on volume measurements.
How to Build and Manage a Wood-Fired Oven Fire
Managing a wood-fired oven fire is a skill that takes practice. The goal is not heat, but held heat. You need to bring the oven up to temperature and then let it stabilize before bread ever touches the floor.
The best woods are dry, hard, and aromatic. Olive wood gives a sweet, gentle smoke. Oak and beech produce a clean, even heat. Avoid softwoods like pine or fir—they burn too fast and leave sticky resin on the oven floor. Never use treated wood or lumber scraps. Your bread will taste like a brush fire.
Start by building a small teepee of kindling in the center. Light it and add progressively larger logs as the fire catches. Let it burn for about 90 minutes to two hours. You are aiming for the oven interior to turn a uniform white or light gray—this means the soot has burned off and the thermal mass is fully saturated. At that point, push the embers to one side or rake them out entirely.
Temperature control is the hardest part. An infrared thermometer is invaluable. For bread, you want a floor temperature between 450°F and 550°F (230°C to 290°C). A common mistake is baking too soon, when the oven is still too hot. If the top of your loaf burns before the bottom is baked, your oven was too hot. If the bottom is black before the top is browned, the floor was too hot or the fire was too recent. You learn to read the oven like a friend’s mood—by the color of the flames and the feel of the heat on your face.

Step-by-Step: Dough Preparation and Fermentation
The bread starts the day before. This is non-negotiable for real flavor.
Begin by refreshing your lievito madre or sourdough starter. Combine a portion of it with fresh flour and water and let it double in volume—about 4 to 6 hours at room temperature. Once bubbly and alive, mix it with your main flour, water, and salt. For a basic loaf, use 500 grams of flour, 350 grams of water, 100 grams of active starter, and 10 grams of salt.
Mix by hand or with a stand mixer until a shaggy dough forms. Let it rest for 30 minutes—this is the autolyse. Then knead for 8 to 10 minutes by hand, or 4 to 5 minutes in a mixer on low. The dough should be smooth, elastic, and slightly tacky but not sticky. Do not be afraid to use a little dusting of flour on the bench.
Now comes the patience. Place the dough in a lightly oiled bowl, cover it, and let it ferment at room temperature for 8 to 12 hours. During the first two hours, do a set of stretch-and-folds every 30 minutes. This builds strength without deflating the bubbles. After that, it can rest undisturbed. If you are in Italy and the humidity is high, you might need to reduce the water slightly. If the flour is very dry, you might need to add 10-20 grams more water. The dough should feel like a living thing—soft, pliable, and slightly bouncy.
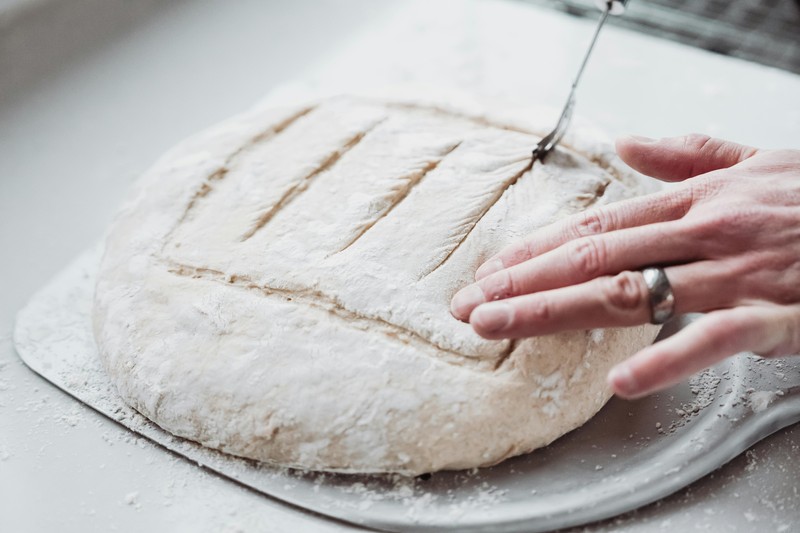
Shaping and Scoring: Techniques from Italian Bakers
Once the dough has doubled or nearly doubled in volume, you shape it. This is a delicate step. You want to degas it gently, not aggressively, preserving the interior bubbles.
The most common shape is the “pagnotta”—a simple round boule. For beginners, this is the easiest. Gently turn the dough out onto a floured surface, fold the edges into the center, and then flip it over. Cup your hands around it and rotate it in a circular motion against the bench, using the friction to pull the surface tight. You want a taut skin across the top. Let it rest, seam-side up, in a floured banneton or a bowl lined with a floured cloth. Cover and refrigerate overnight for the final proof. This cold retard deepens the flavor and makes scoring easier.
Scoring is not just for decoration. It directs the expansion during baking. A simple cross or a single long slash down the center works well. For a more traditional look, try a “giglio” pattern—a star-like design common in central Italy. Use a sharp lame or a clean razor blade at a 45-degree angle. A shallow cut, about half an inch deep, is all you need. A deep cut opens the bread too much.
Baking in the Wood-Fired Oven: Timing and Temperature
When the oven is ready, you load the loaves. Use a wooden or metal peel dusted with semolina flour to slide the bread onto the hot floor. Work quickly to keep the oven door open for as little time as possible.
For a 500-gram loaf, bake at around 480°F (250°C) for 25 to 30 minutes. For larger loaves, figure 40 to 50 minutes, and turn the oven temperature down to about 450°F (230°C) after the first 15 minutes. You want the crust to set quickly to hold the shape, then gradually finish drying out the interior. If you need more steam, spritz the loaf with water just before loading.
Rotate the loaf halfway through for even color. If the bottom is burning, slide a metal spatula or a thin baking sheet under the loaf to lift it off the floor. If the top is too pale, move the loaf closer to the arch or the ceiling of the oven, where it is hottest. Let the bread cool completely before slicing—this is the hardest test of patience, but a hot loaf is a gummy loaf. Resist.
Common Mistakes and How to Avoid Them
Every baker, no matter how experienced, has a story about a loaf that went wrong. Here are the most common we see from our guests at Baccole.
Dough sticking to the peel. This is the classic drama. The loaf goes in at an angle and lands in a heap. The fix is more semolina on the peel, and a quick, confident jerk of the wrist. Practice with a few small rolls before you risk a big loaf.
Under-fermented dough. A dense, flat crumb usually means it needed another hour or two of bulk fermentation. The dough should feel airy and look inflated, not just slightly puffy. Give it time.
Oven temperature too high. A roaring fire is not your friend. If the crust chars in the first 10 minutes, your oven is too hot. Rake out embers and let the floor cool for 15 minutes before baking.
Not preheating long enough. A thin, pale crust suggests the thermal mass was not fully saturated. The oven requires a full two-hour burn. Rushing it produces mediocre bread.
Using the wrong flour. A low-protein flour will not develop enough gluten for that airy crumb. Stick to high-protein bread flour or Italian tipo 0 or tipo 1. It makes a tangible difference.
I’ve used both approaches extensively, and honestly, it depends entirely on what you’re trying to accomplish.
Best Experiences for Traditional Bread Baking in Italy
If you want to learn this craft hands-on, there are several exceptional agriturismos across Italy that offer workshops. These are not just demonstrations; you get your hands in the dough from start to finish.
Baccole (Tuscany). Our own property offers a half-day or full-day bread workshop, including a lunch with your freshly baked loaf, paired with local wines and olive oil. The setting is a restored farmhouse with views of vineyards. Best for couples and solo travelers looking for a deeply personal experience. Language is Italian with English translation. Cost is approximately €70-€100 per person.
Podere Il Casale (Umbria). A family-run operation focusing on ancient grain varieties. Their workshop runs for a full day and includes a tour of their mill. Best for serious bakers interested in the grain-to-loaf journey. Language is Italian, with some English spoken. Cost is around €90-€120 per person.
Masseria Don Piccolo (Puglia). An olive farm with a dedicated bread oven. Workshops are often part of a broader cooking experience. Best for families, as children can help shape small rolls. Language is English and Italian. Cost is approximately €60-€80 per person.
Fattoria di Montestaffoli (Tuscany). This property offers a short, two-hour bread demonstration followed by tasting. It is less hands-on but ideal for travelers on a tight schedule who still want to see the process. Best for quick immersion. Cost is around €40 per person.
What to Bring: Essential Gear for Your Bread Baking Workshop
Most agriturismos provide the bulk of the equipment, but a few personal items will make the experience far more enjoyable.
- Comfortable, closed-toe shoes. You will be standing on stone floors near a hot oven. Do not wear sandals.
- A lightweight apron. Some places provide them, but not always. A sturdy cotton apron is better than a fancy one.
- A small notebook and pen. The recipes are usually given as verbal instructions with variables. Write down the exact ratios of flour to water used that day, the oven temperature, and the baking time. That information is gold.
- A small container. Many hosts will give you a piece of their lievito madre to take home. Bring a small, clean glass jar with a lid. Do not assume they will provide one.
- A digital scale. If you have one, bring it. You will learn the precise weights of Italian flours, which differ from what you find at home. It is a small investment for accurate replication later. Beginners who do not yet own one may find a reliable digital scale useful for consistent results.
Do not bring bulky items like loaf pans or large mixing bowls. They will not be used, and they take up luggage space. The workshop will have everything you need.
How to Replicate Italian Bread at Home Without a Wood-Fired Oven
The reality is few of us own a wood-fired oven in our backyard. But that does not mean you cannot achieve a similar result. The principles of technique and ingredients transfer. You just need to adapt your equipment.
The best substitute is a Dutch oven. A heavy enameled cast iron pot with a lid mimics the steam retention and even heat of a wood-fired oven. Preheat the pot in your home oven at 475°F (245°C) for 45 minutes. Carefully place the proofed loaf inside, score it, and cover with the lid. Bake for 25 minutes covered, then remove the lid and bake for another 15 to 20 minutes until deeply browned. The result is a crust that rivals anything from a brick oven. For those looking to invest in this approach, a well-made cast iron Dutch oven is worth considering.
A baking stone or steel is a decent alternative. Place it on the bottom rack and preheat for an hour. Slide the loaf onto the stone using a peel, and toss a few ice cubes into a preheated pan on the bottom of the oven to create steam. The crust will be good, but not shattering. A Dutch oven is simply more effective.
For those committed to authenticity, consider a lidded bread pan like the “Pullman pan.” It shapes the loaf into a neat, even square, ideal for panini or toast. But for a free-form loaf, the Dutch oven is the gold standard. The real key is temperature. Home ovens fluctuate; invest in an oven thermometer to know the actual temperature inside. Do not trust the dial.

Why Learning Traditional Bread Baking Deepens Your Italian Travel Experience
Bread is a gateway to understanding a place. In Puglia, the altamura loaf is not just bread—it bears a protected geographic status. In Tuscany, the lack of salt tells a history of salt taxes and political rebellions. When you learn to make bread with local hands in a local oven, you are not just adding a skill to your resume. You are entering a conversation that has been running for centuries.
You will start tasting bread differently. The olive oil you drizzle on it will have more depth. The wine you pair with it will feel more deliberate. You will walk into a bakery in any small town and understand what you are looking at—the quality of the flour by the color, the fermentation time by the crumb, the oven type by the crust. It changes you from a tourist into a traveler, from a visitor into someone who truly knows a place.
Ready to Experience Traditional Bread Baking in Italy?
There is a difference between reading about this practice and living it. Feeling the heat of the oven on your face. Smelling the dough shift from raw to toasted. Cracking open a loaf you shaped yourself. That is the kind of memory that does not fade.
If this article has stirred something in you—a curiosity, a desire for a deeper connection with Italian culinary culture—then now is the time to move from reading to doing. Baccole welcomes guests year-round for hands-on bread workshops in the heart of Tuscany. You will stay in our farmhouse, eat the bread you baked, and leave with a starter to continue the practice at home.
I’ve been through this process enough times to know that the best choice is the one you’ll actually use.
Ready to explore? Start here by visiting our accommodation and activity pages. The fire is waiting.